
Admin Features Guide
Each department can specify one or more "Admins" who have access to additional features that are not available to regular (non-admin) responders. Click on any section below to expand it and learn more about that feature.Add a new responder
Adding a new responder is now (as of version 2.4.0) a two step process that must be done sequentially:
Note: As of version 2.9.0, an admin can authorize a user for another department to which the admin already belongs. See below for details.
- Step 1: The user needs to download IR app from the app store (iPhone) or Google Play Store (Android). They can either search the store for "Incident Responder", or use the links provided at https://ehnow.com/ir. Or they can use the web version of the app at https://ehnow.com/ir/web. Once they install and run the app, they click the "Register" link and follow the prompts to register an account with their chosen email address and password. At this point the user will be taken to a screen that says "Not Authorized", with a "Retry" button that will give them access to you department only after you perform Step 2.
- Step 2: An Admin user then needs to go to the "Responders" tab on their own device, and select "Authorize New User..." from the three-dot menu at top left. Enter the email address of the responder, and click "Authorize". The user's account will then be authorized for access to your department. Note that the user must have already downoaded the app and created an account, otherwise you will get a message that the account doesn't exist.
Note: As of version 2.9.0, an admin can authorize a user for another department to which the admin already belongs. See below for details.
Authorize Existing User for Another Department
As of version 2.9.0, an admin can authorize an existing user for another department to which the admin already belongs. To do this, you must be an Admin of both departments.
Go to the responder's detail page, and select "Authorize Another Dept" from the Admin Settings section, then select the department for which you want to authorize the responder.
This will also copy the responder's contact info over to the new department. Note that the permissions will take about an hour to take effect (or the user can force it to take effect
right away by going to Settings => Advanced => Force Token Refresh), at which point the user will see the
new department in their department dropdown list at the top of the Incidents tab.
Delete a Responder
When viewing a responder's detail page, Admins will see a trash icon
in the upper right corner. Click it (and confirm) to delete the
responder. This will archive the responder's database record so that it can be
retrieved later if needed (you can view/retrieve deleted responders by choosing
the "View Deleted" menu item on the Responders tab). Once the responder has been deleted,
they are no longer authorized to view any data (incidents, responders, etc) for the department from which they were deleted.
If the responder is no longer active, but you want them to still be able to get notifications and view department data: instead of deleting them you can set them to "Inactive" in the Admin Settings section of their responder detail page. One use case for this would be for "Emeritus" responders who are no longer active but whom you want to be able to still view the department data. Don't use this feature for responders who have left the department and should no longer be using the app, instead delete them per the instructions above.
If the responder is no longer active, but you want them to still be able to get notifications and view department data: instead of deleting them you can set them to "Inactive" in the Admin Settings section of their responder detail page. One use case for this would be for "Emeritus" responders who are no longer active but whom you want to be able to still view the department data. Don't use this feature for responders who have left the department and should no longer be using the app, instead delete them per the instructions above.
Create a Custom Availability Status
Admins can create a custom availability status for responders to use. This is useful for departments that have
more than just the default Available and Unavailable statuses. For example, a dept can add a status named
"Staffing" to let responders indicate that they are on shift.
To create a custom status or configure an existing one, go to Settings => Customize Dept => Misc Settings. The "Custom Status" list will be at the bottom (yes you can create more than one). If this section doesn't exist yet in your department, contact the app developer to initialize it. You can set various properties of each status, such as the response background color and priority for list sorting, as well as the icon used to represent the status on the Availability dialog and on the header section of the Responders tab.
Note: the "Icon Id" refers to the "code point" for a FontAwesome icon, which you can find at https://fontawesome.com/icons Only regular icons are supported, not the "Pro" icons. Get the unicode value for the icon and convert it from hexadecdimal to an integer. For example, the "fa-user" icon has a code point of "f007", so the integer value is 61447.
To create a custom status or configure an existing one, go to Settings => Customize Dept => Misc Settings. The "Custom Status" list will be at the bottom (yes you can create more than one). If this section doesn't exist yet in your department, contact the app developer to initialize it. You can set various properties of each status, such as the response background color and priority for list sorting, as well as the icon used to represent the status on the Availability dialog and on the header section of the Responders tab.
Note: the "Icon Id" refers to the "code point" for a FontAwesome icon, which you can find at https://fontawesome.com/icons Only regular icons are supported, not the "Pro" icons. Get the unicode value for the icon and convert it from hexadecdimal to an integer. For example, the "fa-user" icon has a code point of "f007", so the integer value is 61447.
Create a new incident (eg Admin Page)
Choose "Create New Incident" from the three-dot menu at the top left of the Incidents tab. This will bring up a screen where you can select from a list of templates. You can also edit the templates by clicking the pencil icon on the right, or add new templates by clicking the "+" button at the top right. Choose the template that you want to use to generate the page, eg "Admin Page". This will bring up a screen where you can enter data for the incident (description, address, town, details, etc). Some fields will be pre-filled based on what is in the template.
This will bring up a screen where you can select from a list of templates. You can also edit the templates by clicking the pencil icon on the right, or add new templates by clicking the "+" button at the top right. Choose the template that you want to use to generate the page, eg "Admin Page". This will bring up a screen where you can enter data for the incident (description, address, town, details, etc). Some fields will be pre-filled based on what is in the template. At the bottom of the page, you will see the following options:
This will bring up a screen where you can select from a list of templates. You can also edit the templates by clicking the pencil icon on the right, or add new templates by clicking the "+" button at the top right. Choose the template that you want to use to generate the page, eg "Admin Page". This will bring up a screen where you can enter data for the incident (description, address, town, details, etc). Some fields will be pre-filled based on what is in the template. At the bottom of the page, you will see the following options:
- Resource Types: Choose the resource types that can be assigned to this incident. This option is only available for Shared Resource Departments, eg county-wide streak teams.
- Track Attendance: Enable this if you want attendance to count. Typically you will leave this unchecked for admin pages since those aren't real incidents. End of year reports and responder attendance count will ignore incidents for which this option is not enabled.
- Availability Only: Enable this if you are just taking a poll to see who is available and who is unavailable for an event (track attendance is automatically disabled when this option is enabled). When this option is enabled, the "En Route" button will not be shown, only the "Available" and "Unavailable" options will display.
- Notification: Choose the type of notification you want to send for this incident.
- None: No notification will be sent.
- Low Priority: A notification will be sent with a low priority sound (the default system beep sound).
- High Priority: A notification will be sent with a high priority sound (the default new incident sound used for dispatched incidents).
Add a response for any responder
On the incident detail page for a given incident, choose "Add Responder"
from the three-dot menu at top right. Choose a responder from the list that
comes up, and it will then go through the same prompts as when you add your own
response, except that you only need to choose the station, and the
response is automatically set to "Attended" (you cannot set
Available/Unavailable responses with this feature). Note that if the
chosen responder already has a response, the "Clear" option will
show up at the bottom of the stations list, choose that if you want
to delete a user's response.
This feature can optionally be enabled for all responders, but by default it
will only show up for admins.
Edit details, availability and admin/duty flags for any responder
Admins have the ability to set a user's details (ie contact
info, home station, etc) and availability status. Also, any user can
be given admin and duty priviliges. All of these settings can be
found on the responder info page for the responder, under the
"Admin Settings" section.
Edit Incident Details
Select "Edit Incident" from the three-dot menu on the incident detail page.
Any field can be edited, but edit with care as some fields should not be edited.
The app uses a generic interface for this feature which shows a direct
view of the database, so it's not as user-friendly as the rest of the app.
Delete an Incident
This option may not be enabled for some departments. If it is
enabled, you will see a "Delete Incident" menu item on the three-dot
menu on the incident detail page. Select it
and you will be asked to confirm that you really want to delete the
incident. This action cannot be reversed, and will result in all
incident details and all responses being permanently deleted.
Issue a Secondary Notification
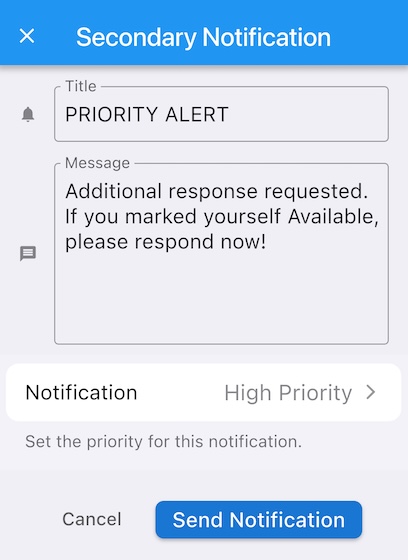
Admins will have a "Secondary Notification" menu item in the three-dot menu on the incident detail page.
Select it and you will be asked to enter a message (or you can stick with the default). Generally this will be used
to re-issue a notification for an incident that has already been dispatched, but for which additional manpower is needed, or
some other vital information needs to be conveyed.
Responders will then receive a notification and the incident will have a section at the top displaying the message, as shown here:
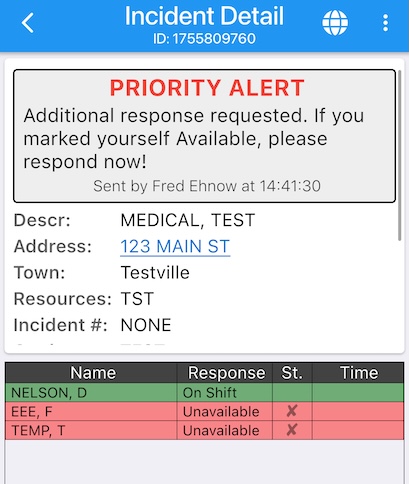
Responders will then receive a notification and the incident will have a section at the top displaying the message, as shown here:
Edit the Duty Calendar
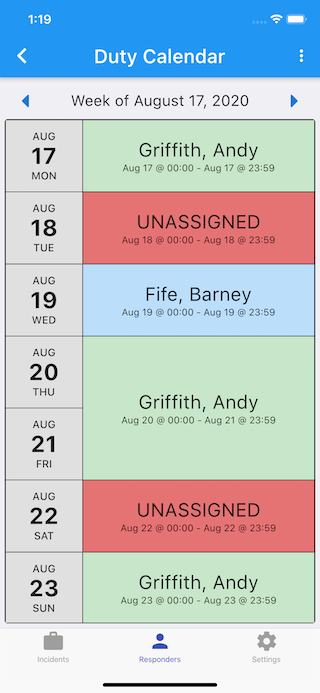
The Duty Calendar feature is optional and some departments may not
use it. If enabled, it can be accessed from the Calendar icon at the
top right of the Responders tab. Only admins and Duty Officers are
able to edit the calendar. It will initially show the calendar
for the current week, and you can click the left/right arrow buttons at the
top to advance to previous and next weeks. To return quickly to the
current week, double tap on the week date at top.
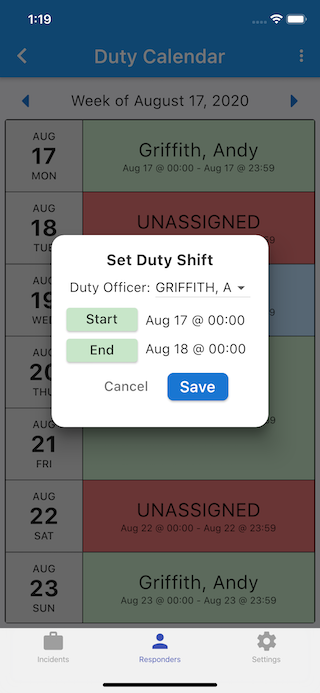
Click on a date on the left side to bring up the Duty Assign dialog, where you can set the Duty Officer and start/end times for their shift. Note that only responders who are marked as "Duty Eligible" will show up in the dropdown list of choices. Shifts will show on the right side of the page, color coded by responder. Click on a shift to edit it, or click on an "Unassigned" block to assign that block. Swipe a shift (left or right) to delete it. Within the Duty Assign dialog, click the start/end buttons to edit the start or end times if needed.
To quickly copy a full week's schedule from one week to another, use the three-dot menu at the top right. Go to the week containing the shifts that you want to copy, select "Copy" from the menu, then advance to the desired week and select "Paste".
Click on a date on the left side to bring up the Duty Assign dialog, where you can set the Duty Officer and start/end times for their shift. Note that only responders who are marked as "Duty Eligible" will show up in the dropdown list of choices. Shifts will show on the right side of the page, color coded by responder. Click on a shift to edit it, or click on an "Unassigned" block to assign that block. Swipe a shift (left or right) to delete it. Within the Duty Assign dialog, click the start/end buttons to edit the start or end times if needed.
To quickly copy a full week's schedule from one week to another, use the three-dot menu at the top right. Go to the week containing the shifts that you want to copy, select "Copy" from the menu, then advance to the desired week and select "Paste".
 |
 |
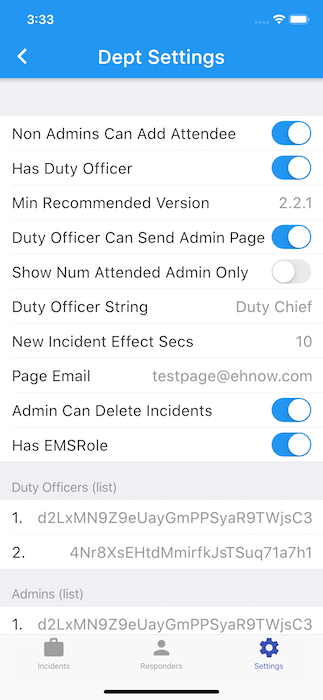
Edit Department Settings
IR app offers flexibility in how certain features of the app behave
for different departments. Admins can customize some behaviors by
clicking the "Customize Dept" option on the Settings tab. Beware that this
feature allows the admin to edit the raw database values directly,
so be very careful when making changes!
 |
Shared Resource Dept (eg Strike Team) Settings
A shared resource department is one that shares resources across multiple departments, for example
a county-wide strike team. In a normal department, each responder is implicitly the resource that is
associated with a response. In a shared resource dept, each response needs to specify the resource by
resource type and identifier, for example "Type 3" and "E1165".
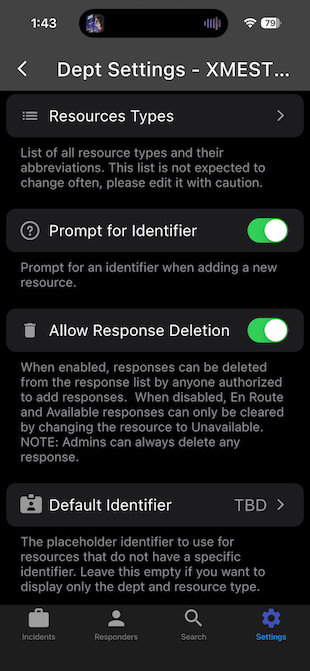
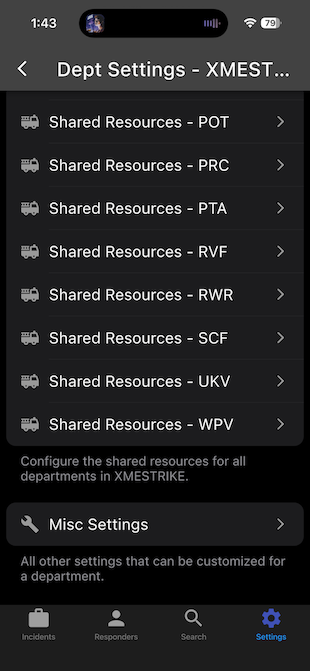
Under Settings => Customize Dept, the available settings are different than for a normal department. Here the
admin can edit the list of all resource types for the shared resource dept, as well as manage the list of dept-specific
resources for each dept (each dept can also edit their own resource list directly on the Settings page).
 |
 |
Creating a Shared Resource Incident/Deployment
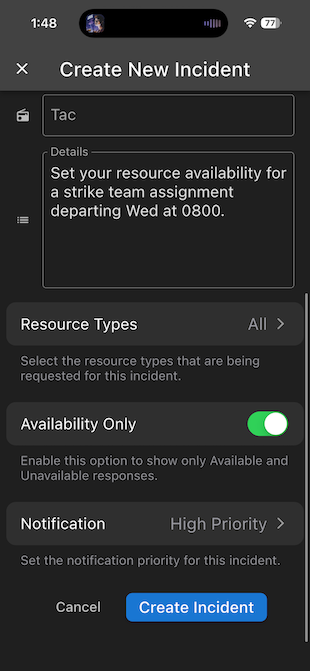
Admins can create new incidents for the shared resource dept just like with a normal dept, but there are some additional options:
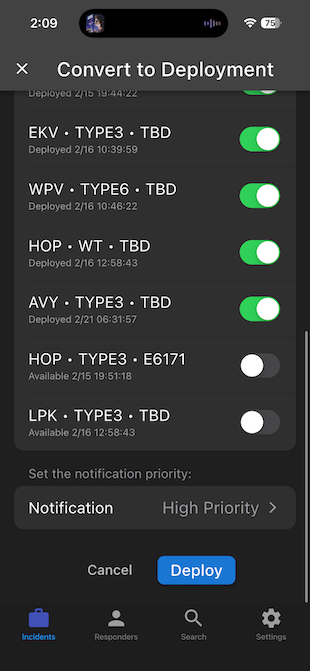
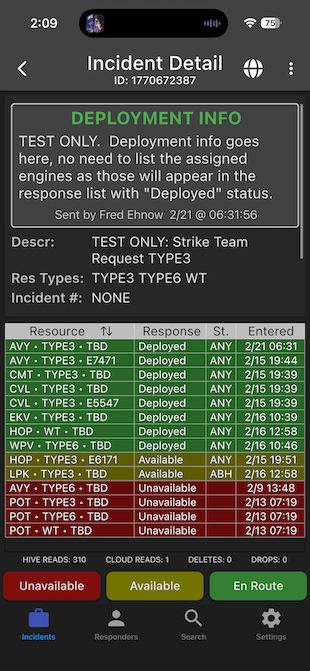
Once the members of the strike team have added their resource availability, the admin can convert the incident into a deployment by selecting "Convert to Deployment" from the three-dot menu. This will present a dialog with the list of available resources, each with a checkbox to assign that resource to the deployment. Also, at the top of the dialog (not shown in the screenshot below because it is scrolled off the top) are text fields for the title and message that gets added to the top of the deployed incident. Once this text has been entered and the resources have been selected, click the "Deploy" button. This will send a notification to all department members so they know that the incident has been converted into a deployment. After it has been deployed, you can update the message or resources by selecting "Update Deployment" from the three-dot menu.
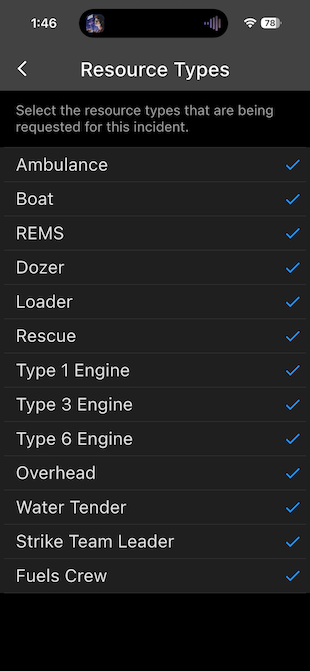
- Resource Types: Choose the resource types that can be assigned to this incident.
- Availability Only: Enable this if you want to be able to later convert the incident into a deployment (see below for details). Note: this option also exists for regular depts, but it is called out here because you need to enable this option for a shared resource dept if you want to be able to later convert an incident into a deployment.
 |
 |
Once the members of the strike team have added their resource availability, the admin can convert the incident into a deployment by selecting "Convert to Deployment" from the three-dot menu. This will present a dialog with the list of available resources, each with a checkbox to assign that resource to the deployment. Also, at the top of the dialog (not shown in the screenshot below because it is scrolled off the top) are text fields for the title and message that gets added to the top of the deployed incident. Once this text has been entered and the resources have been selected, click the "Deploy" button. This will send a notification to all department members so they know that the incident has been converted into a deployment. After it has been deployed, you can update the message or resources by selecting "Update Deployment" from the three-dot menu.
 |
 |
Send "Public Notification" text messages
On the Incidents tab, choose "Public Notification" from the three-dot menu.
This will display a list of people who are subscribed to get a text message (or email)
automatically when a new incident occurs (this only works currently for incidents
that are triggered by cad page, not for incidents that are generated from within the app).
Click the "+" icon at top right to add a new subscriber. Enter their name, phone number (or email),
and select their cel carrier (or "Email"). You can optionally filter by town or incident type.
This feature can be used for notifying spouses of firefighters, or community members who
have a need to be notified when new incidents occur (such as LZ owners).
Send "CAD Page Forwarding" text messages
On the Incidents tab, choose "CAD Page Forwarding" from the three-dot menu.
This will display a list of people who are subscribed to get a full raw cad page forwarded as a text message (or email)
automatically when a new incident occurs (this only works currently for incidents
that are triggered by cad page, not for incidents that are generated from within the app).
Click the "+" icon at top right to add a new recipient. Enter their name, phone number (or email),
and select their cel carrier (or "Email").
Reconcile Mode
On the Incidents tab, choose "Reconcile Mode" from the three-dot menu.
In this mode, reconciled incidents will display with a light blue background,
and in the incident detail view you can toggle the "Reconcile" flag for each
incident by selecting "Reconciled" from the three-dot menu. This feature is
useful for keeping track of which incidents have been filed in Image Trend or
whatever tracking software your department uses.
Generate PDF Report
On the Incidents tab, choose "Generate Report..." to bring up a dialog
with choice for start/end date and incident status (All, Reconciled or Non-Reconciled).
Currently the date range is limited to the currently loaded incidents, so scroll down to
load more incidents prior to running the report if you want older incidents. (This will
be fixed in a future version.)